Pressure-fed paint guns offer many advantages over gravity-feed models. They are capable of higher production and spraying heavier coatings. However, for them to function correctly, the paint tank must be properly configured to deliver the correct amount of product and pressure.
Next, we'll talk more about the paint tank and how to use it correctly.
What is a paint tank?

One paint tank It is a container used to store and supply paint to a paint gun. It is usually made of metal and has a capacity for various volumes of product.
The tank is connected to the paint gun via a hose and is pressurized with compressed air to allow the paint to be sprayed onto the surface to be painted.
Paint tanks are frequently used in larger painting jobs with minimal color change, where it is necessary to paint large areas quickly and efficiently.
How to assemble a paint tank
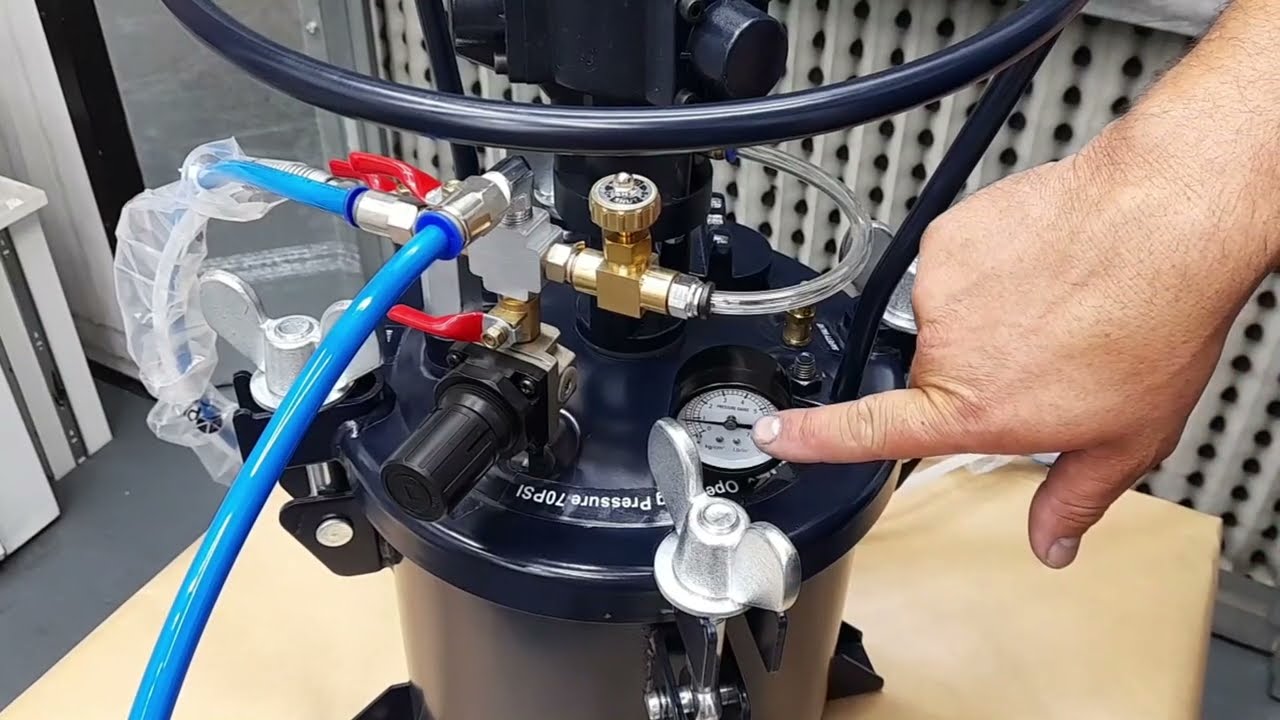
The first step in assembling the paint tank is connecting the air supply hose to the paint tank. Other important parts of the tank that must be correctly configured are the valve, which opens and closes the air intake to the tank, and the pressure regulator, which controls the pressure applied to the tank to send the paint to the spray gun.
Next, the tank is connected to the spray gun. The atomizing air pressure is adjusted using the air control located on the spray gun. The control should be increased until the atomizing pressure recommended by the paint or spray gun manufacturer is reached.
The amount of paint is also adjusted directly on the spray gun and varies depending on both the model and the job being done. To better understand how to adjust a paint gun, check out our [link to guide/resource]. article on the topic.
Some models allow for the addition of more ink without needing to fully open the tank lid, but certain precautions must be taken, especially releasing all pressure from inside the tank before refilling it.
Some high-quality models also offer the option of homogenizing the paint using a pneumatic agitator. This practice is especially important when using metallic paints. Since this homogenization is performed directly in the tank, the professional saves time and ensures ideal paint homogenization quality.
At the end of the painting process, the tank must be emptied, cleaned, and disassembled for cleaning. It is recommended that appropriate cleaning solvents be used and that the equipment be disassembled and cleaned carefully, like any other painting equipment.
Advantages of using a pressure tank
Uniform spraying: With a pressure tank, the paint is applied evenly, resulting in a smooth and uniform paint layer on the surface.
Time saving: Using a pressure tank for a paint gun allows for the application of a large amount of paint at once, saving time and reducing the need to frequently refill the gun.
Ink economy: The ink is sprayed efficiently, which reduces ink waste and consequently material costs.
Greater reach: A pressure tank can provide constant pressure to the paint gun, allowing paint to be applied at a greater distance than would be possible with a conventional paint gun.
Ergonomics: With a pressure tank, the paint gun is easy and lightweight to handle, allowing the painter to work for extended periods without the uncomfortable weight of a paint cup.
Versatility: Pressure tanks can be used with a variety of paints and coatings, including water-based and solvent-based paints, as well as epoxy and polyurethane coatings.
To learn more about painting equipment and other content related to painting and finishing, access the rest of our website. blog, always with new and exclusive content.